
How to Create a Family Cookbook Template in Microsoft Word – Updated 2026
If you’ve been collecting family recipes for years, creating your own custom cookbook template in Microsoft Word is one of the most practical ways to preserve them. I’ve been slowly building mine for a long time, and over the years I’ve learned what works and what doesn’t.
In this updated guide, I’m sharing my current process for creating a family cookbook template in Microsoft Word — including my new favorite 2-column, no-image template that has made a big difference as my cookbook has grown.
Cookbook Series
In case you missed it, I have published a series of blog posts over the past year or so that explore all aspects of creating a cookbook from cover to back:
- The 4 Affordable Binding Options for Your Cookbook
- Three FREE Recipe Book Covers Covers
- Printer Settings to Print Cookbook as a Booklet
- Categories for Cookbooks
- Updates to the Table of Contents with Fields
- Creating a Cookbook Index
- Adding Images to Your Cookbook Template
- FREE Cookbook Category Divider Pages & Cover
Why a Personal Cookbook
I come from a LONG line of recipe collectors. Through the years, my family has unashamedly asked for recipes from friends, family members, and random strangers in line at the grocery sore (I kid – sort of). Because of this, we’ve amassed tons of favorite recipes from all over the place.
Growing up, I watched my mom type recipe books up on the library typewriter and created her own cookbook for the whole family. Each recipe book was her labor of love to us. Her cookbooks also included funny stories of life on the farm. I’m sure family and friends were thankful for those cookbooks.
As I got older, I started helping her compile recipes into digital cookbooks for printing. In total, I’ve worked on 7 different cookbooks for family and our church. I’ve learned a trick or two about the best way to work in MS Word to create a cohesive cookbook with a table of contents and index that is neatly organized.
The Drawback to Professional Cookbooks
Before I show you how to make your own, let me address that there are cookbook publishing companies that will do all the styling for you. But handing over the reins to a professional has 3 major downsides.
- The number one downside is cost. While a publisher will produce a beautiful cookbook, you will still need to compile, format, and input your recipes. Cookbook companies often charge per recipe and revision. That said the price/cookbook is significantly higher depending on the number of cookbooks you order.
- Loss of control of the creative process. You can only choose from templates they offer. They have different options, but still there are limitations.
- One shot and it’s done. Once you submit the cookbook to be printed, that’s it. I’m always changing recipes and adding new ones so a professional cookbook company feels too final to me.
There are obvious benefits with professional cookbooks such as pre-formatted design templates (if you just want easy options), layouts, covers, kitchen helps and tips pages, and dividers. But I have some solutions to DIY these sections posted in the series list at the beginning of this post.
Tips for Cookbook Design
Here are some of my biggest tips to designing a cookbook:
- Photos: If you choose to include photos within your recipe, you’ll want to use high-quality pictures that showcase the end result. Your photo should be clear, bright, and appetizing. (WARNING: if you incorporate photos – it will increase your file size and may cause lag as you edit.)
- Use color wisely: You can use color to highlight important sections of the book but I tend to avoid color to reduce printing costs.
- Keep it simple: Avoid using too many different fonts and try to use simple fonts for the recipe portion. Simple is better. I like to search the term: “font pairing” with the main font I’m using for my recipe titles to see ideas for recipe text. Overall, I’ve started limiting my cookbooks to no more than 3 fonts.
- Make it personal: Include a note section after the title to jot down details about the recipe. If Dad really loved to make a recipe while camping, share that as a memory for others to enjoy
- Decide the final cookbook print size. Most common print sizes are letter (full sheet of standard printer paper) or half-sheet size (booklet printing so each page will be 5.5″ X 8.5″) For my video below, I demonstrate the half-sheet size – BUT definitely check out my updated post about printing as a booklet – lots of new info there that may conflict with the video.
Why I Updated My Microsoft Word Template
My original template (using fonts; Bodoni 72 Small Caps, Catandra Script, and Century Gothic) fit my needs for quite some time. SIDE NOTE: If you do not have those fonts, it’s not a game-changer. Just know that when you open the document, you must update your template to the fonts you wish to use.
Next I shared a document with tables to copy/paste into the template for recipe images. This is still a great option, but I noticed my computer had significant lag while editing the cookbook with the tables and images especially as my cookbook grew and grew).
The main issue with the original template is that there were tabbed ingredients, and that can make it more tedious to edit. So I started using a simpler, faster template I’d used previously on a couple cookbooks. This 2-column, single line ingredients, image-free template is so much quicker to edit, looks clean and classy and I think you’ll love it too. For fonts on this one, I used Catandra Script, Radley, and Montserrat)
Benefits of the New 2-Column No-Image Template
- Dramatically reduces document lag (even with 100+ recipes)
- Much easier to edit ingredients and instructions
- Cleaner layout when printed
- Faster overall workflow
WARNING: If you are switching between single column (for cookbook sections) and recipes (2-column) like I have in the download, it can get a bit tricky on the type of section breaks you have. I’ll see about providing details on that in the future. Let me know if you need help with that and I’ll move it higher on my priority list.
Page Setup & Margins (Very Important)
Before adding recipes, set up the margins. Booklet printing requires the most specificity for margins since there is shrinkage when you convert to a half sheet size. So first thing – decide if you’re going full sheet or half-sheet cookbooks.
Full Sheet Margins
For full sheet cookbooks, you’ll just need to pay attention to your left margin for your binding method. Select Custom Margins and set the left margin minimums as follows:
Comb or Wire Bound:
- Left Margin Minimum: 0.4″
3 Ring or Disc Bound:
- Left Margin Minimum: 0.5″
Half-Sheet (Booklet Printing) Margins:
For booklet printing – the margins are going to need some serious tweaking. I have a whole post about printing a cookbook as a booklet. Depending on your binding method, these are the exact margins (not minimum) you need to prevent excessive margins and prevent your text from shrinking. I promise, they WILL look different when you print your booklet.
Again, select Custom Margins and then select Mirror Margins.
Comb or WIRE BOUND:
- Inside Margin: 0.3″
- Outside Margin: 0.9″ or 1.0″
- Top Margin: 0.1″
- Bottom Margin: 0.1″
3-Ring or Disc BOUND:
- Inside Margin: 0.9″ or 1.0″
- Outside Margin: 0.9″ or 1.0″
- Top Margin: 0.1″
- Bottom Margin: 0.1″
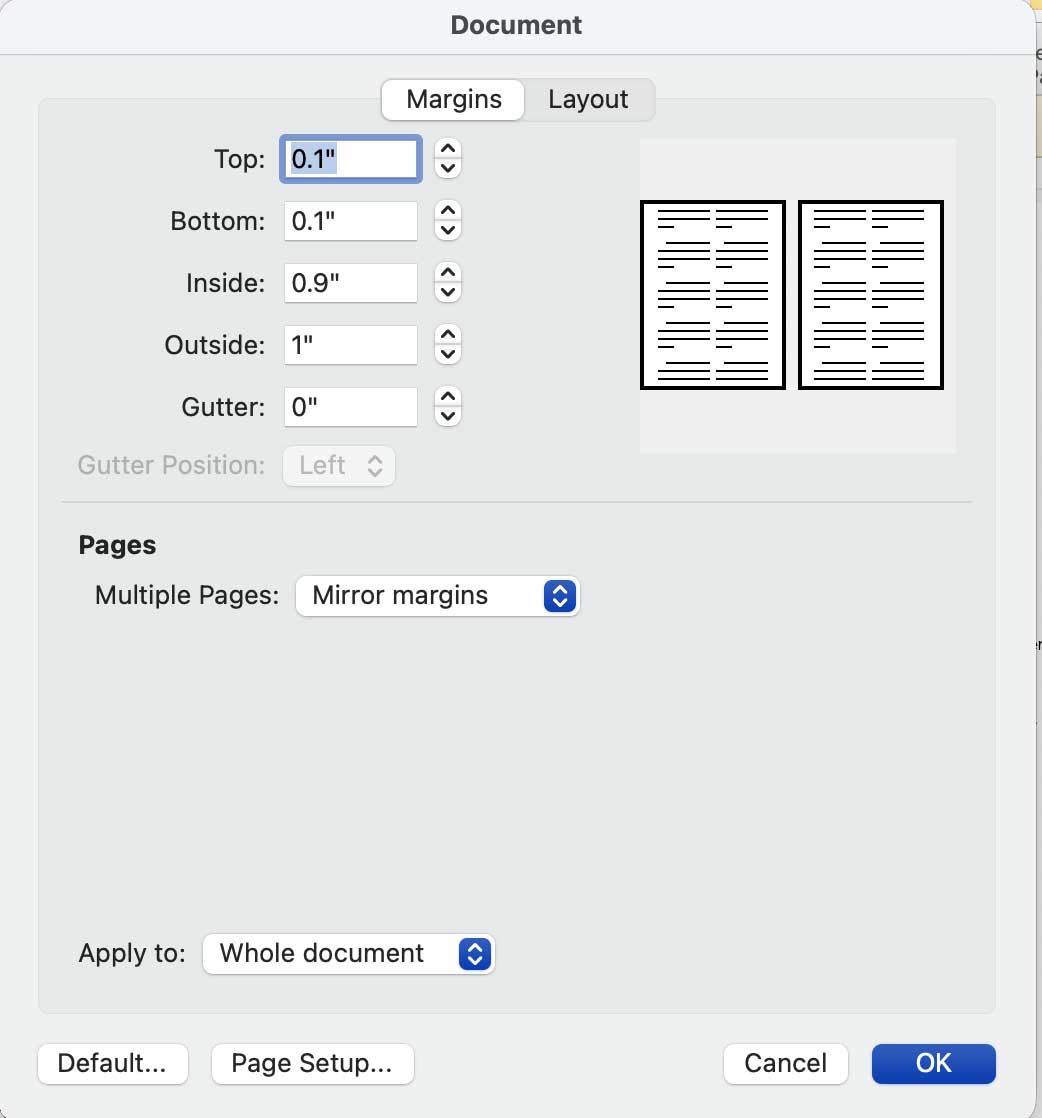
IMPORTANT: Apply the margins to the whole document (this is especially important if you have sections like I do in the new cookbook template).
The tight top and bottom margins look ridiculous, but you’ll need them for when you convert the document to a booklet for printing, (see my updated printing post for details).
Using Styles – the Most Important Step
Even with the new template, using Styles is still the #1 key to a clean, consistent cookbook. Once set up, you can change fonts, spacing, or formatting across the entire document with just a couple clicks.
In the video below, I demonstrate how to create a cookbook template using styles with a table of contents.
I highly recommend you watch the video above where I demonstrate working with styles. (you can fast forward to 2:33 minutes if you want to skip my rambling).
Format Your Recipe for Readability
I cannot stress enough, the value of using the styles pane which will help you make sure your text, images, ingredients, etc. are all aligned and have the same font, size, and weight.
Style Your Recipe’s Elements
- Style your Recipe Title under the Heading 1 style – use a different font or color for the title to make it stand out.
- Continue through the rest of the recipe elements such as notes/author, ingredients/instructions header, ingredients list, directions, etc. For these elements of your recipe, you can name the style whatever you’d like.
Update Specific Styles
If you’d like to update a specific style of your cookbook element:
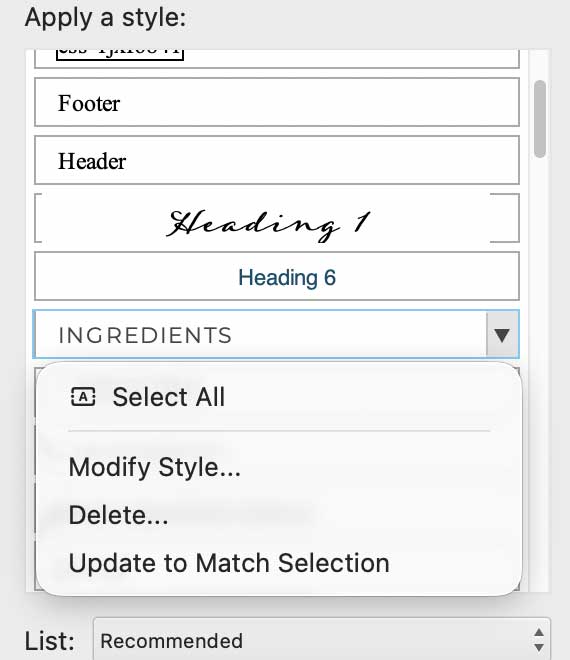
- Go to the styles pane, click the triangle and select the specific style’s far-right triangle.
- Click “Modify Style…” to make changes.
- Another way to do this is to, select the styled text, and click “Update to Match Selection.”
Doing this, will change all the text marked under that style to the change you just made.
Cookbook Organization
Most cookbooks are organized by major categories/sections, (i.e. Bread, Breakfast, Appetizers, etc.). You may also want to include subcategories, (i.e. Yeast Bread, Quick Bread, etc.).
Table of Contents – Two Options
It may seem premature to talk about the table of contents for your cookbook, but I want to give you the two ways to consider how you want your cookbook to look and your table of contents to be structured
1. Easy Way – Use Only Styles
With this route, you’ll use styles Heading 1 (Main Categories), Heading 2, (Subcategories), and Heading 3 (Recipe Titles).
This is your best option if:
- You don’t have a lot of recipes
- You don’t want subcategories
- You still want subcategories but you don’t mind hiding text (by making it white)
- Creating section breaks and working in the hidden text view is challenging for you
2. Little More Effort – Marking Fields
Using fields is a way to tell Word behind the scenes what info you need to go into the Table of Contents. You’ll can still use styles Heading 1 (Main Categories) and Heading 3 (Recipe Titles) but you use fields to manually tell Word what your Categories and Subcategories will be for your Table of Contents.
This is your best option if:
- You have a large amount of recipes in each category and want to divide them into subcategories
- You don’t want to hide text by making it white
- You want more control over your Table of Contents
- You’re okay with working in the character view and comfortable with section breaks
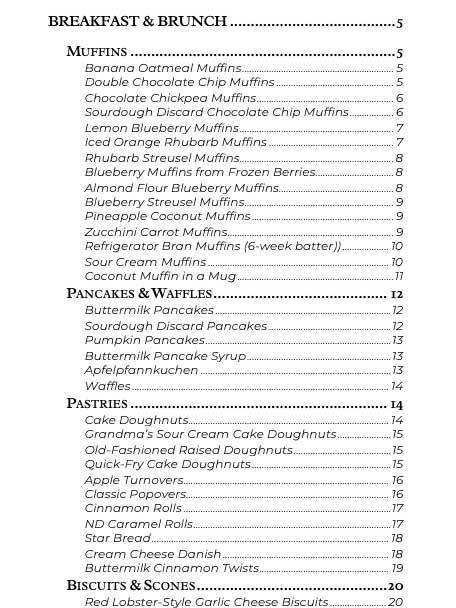
I have a whole post about creating a Table of Contents that you can check out here.
When you create your recipe sections, you’ll start by creating a new style for your cookbook sections, or categories. If you’d like ideas for sectioning your cookbook, see this post. The style for your cookbook section
Headers & Footers – Page Numbers
To incorporate page numbers to your cookbook, place them in the Header or Footer.
- Go to the “Insert” tab and select “Page Number”
- Select the Position and Alignment and Format for your preference.
You may also customize your header and footer with other details such as the cookbook title, category, or subcategory. Truth be told, I haven’t figured out how to do this automatically yet and it’s just not a priority for me.
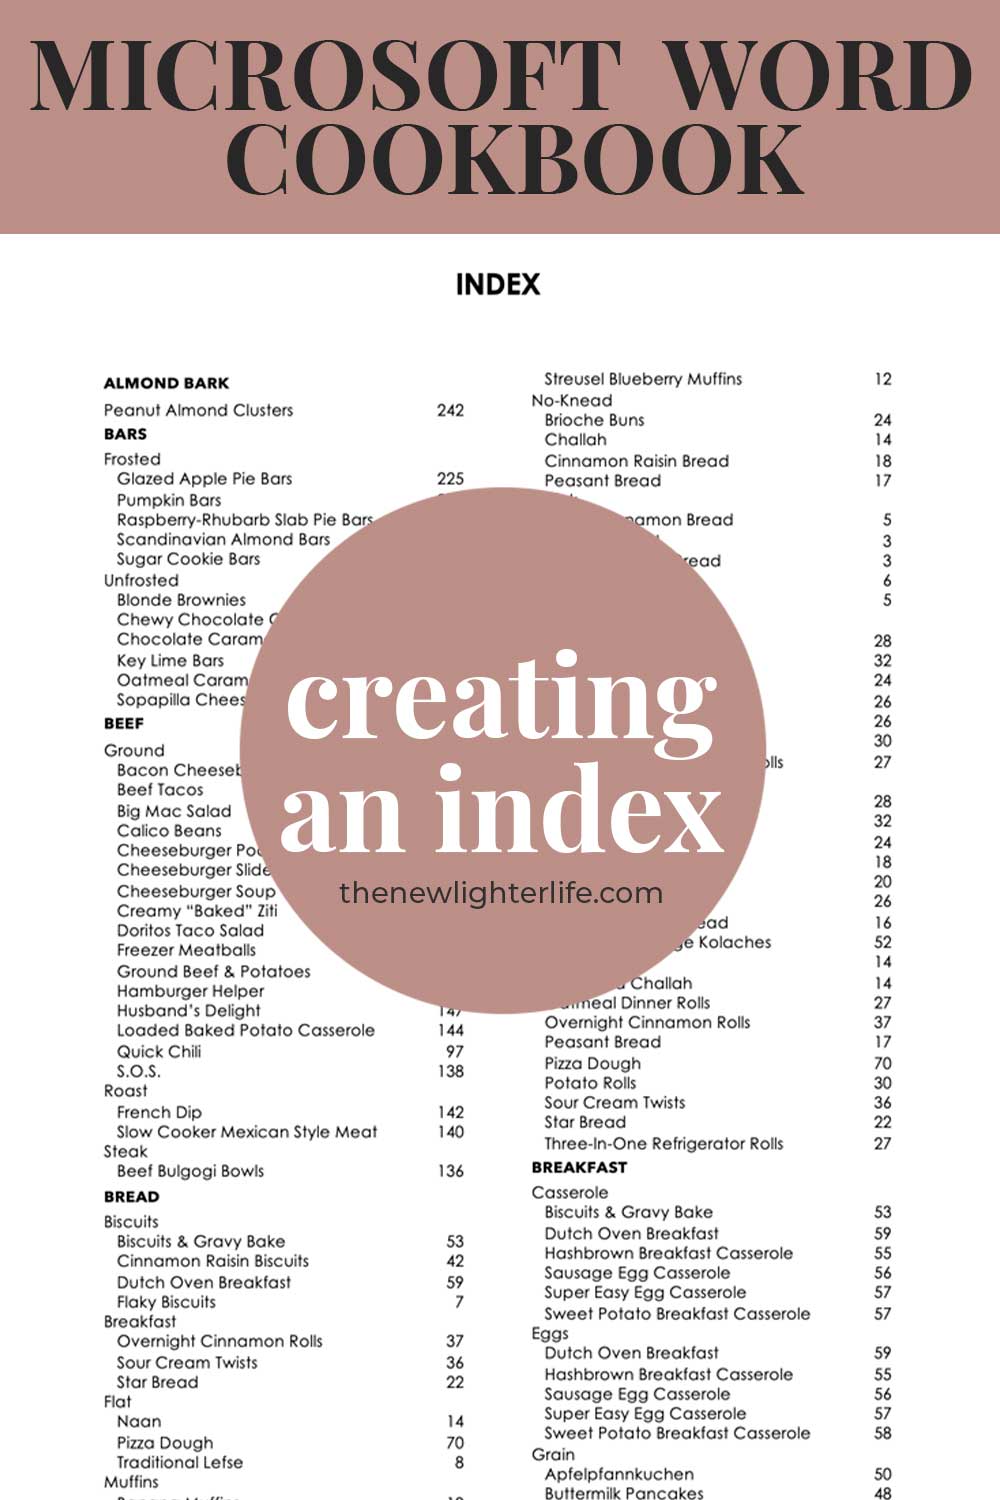
Creating a Cookbook Index
If you choose to create an index, you’ll do this once you have a good number of recipes input into you document. An index is generally found in the back of a cookbook for easy reference.
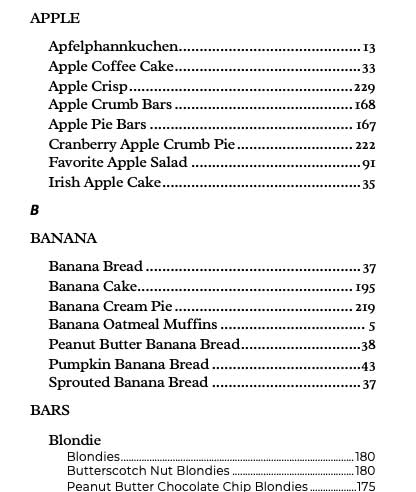
I’ll tell you, it’s a lot of work to make an index – but something I greatly value in my cookbooks. I go into depth on how to do this here and the post includes a video walkthrough of the process. Check it out if this is something you’d like to incorporate.
Final Thoughts
I’ve covered a lot of ground on this post and the linked posts as well. One thing I know for certain, if you’re a recipe collector creating your cookbook in Microsoft Word is an excellent way to preserve those recipes. If you’re compiling recipes for church or family, your labor of love will be treasured by anyone who is blessed with a copy.
I hope you find my series helpful and if there is anything you’re stuck on, please let me know in the comments.
Happy cookbook making!
As an Amazon Associate, I earn from qualifying purchases at no extra cost to you. Thank you for your support!




Thank you for a very informative video about creating a cookbook. I have been trying to create my own cookbook FOREVER and have never been satisfied. I am giving this a go, and hope to settle this fight for good.
I do have a question. I am working on a Windows PC, when I use the table of contents, clicking on a recipe name will not take me to that page. Is this an Apple feature or is something not formatting correctly?
Thank you,
Julie
Hi Julie! I hope you are happy with the results of making your own cookbook template.
To answer your question…in my experience, tables on my Windows PC are also clickable. Are you able to hold the Ctrl key and click to go to the recipe? If that does not work, the only other thing I can think of is to see if you can change some of your options or settings in how Microsoft Word is set up on your computer.
Note: The table will not be clickable or hyperlinked if you are viewing your cookbook on your phone. I emailed my cookbook to myself and tried opening it on my iphone and it will not work on there.
Hello – Your template is beautiful and I cannot wait to use it when converting all my mother’s hand written and clipped recipes into her own binder. The problem is I am unable to download the cookbook template because I cannot add the Chrome extension for some reason. Is there another way to download the template?
Hi Mimi! I’m finally getting to responding to comments and see you can’t download the template. Please check your email inbox for the document. (it may be in your spam as well)
Blessings!
Where can I download the template. I can’t find the link anywhere.
Hi Lydia,
You can find the template here,
Blessings!
I watched your videos and love how you set everything up at the beginning. I want to make my cookbook in a 5 X 7 size. Can you tell me how to do that in Word?
Hi Cindy,
The simplest way I can think of to do this is to adjust your margins and trim your paper once you print. I’ve not done this with my cookbooks so you may have to adjust your print settings. In case you haven’t seen how to print in a booklet format, you can find details on doing that here, h
You may want to start with a new document that is formatted with wider margins and then build your template. If you’ve already started entering your recipes in the template I provided that has wider margins, you can try adjusting your document margins. Before you do that, be sure to adjust your ingredient list tab stop. If you have 2 columns you may want to go to one column or adjust tabbing. Any other indents based on style will also need to be adjusted before you update margins
In tinkering around with settings, I think the following will work for your 5 X 7-inch cookbook.
MARGINS
Top: 2″
Bottom: 2″
Left: 2″
Right: 1.75″
Gutter: 0″
HEADER/FOOTER
2.15″ from top (Header) and from bottom (Footer)
I hope this helps! Blessings!
Thank you so much for sharing your template and for the helpful video–I learned a lot about setting styles.
Do you create an index for your cookbooks? I’d like to create one, so if you have tips, please share!
Like the previous commenter, I, too, have started and abandoned this task several times, but I hope to follow it through this time. My children are getting old enough that I’d like to have a shareable print and electronic recipe collection for them as they leave the nest.
Hi Meredith! So glad it was helpful! It is a huge undertaking to catalog recipes, especially if you’ve collected winners over many years. I know for certain, they will be so thankful for your recipes when they venture off on their own. 🙂
I must confess, I had not thought about adding an index. I’m so glad you as thought because I think that would be very helpful. I have this addition on my to-do list and I hope to get a post and update to the template up on the blog sooner rather than later.
In the meantime, you may want to check out this link which explains the process very well, https://support.microsoft.com/en-us/office/create-and-update-an-index-cc502c71-a605-41fd-9a02-cda9d14bf073
I have 4 Granddaughters that I want to create recipe’s for this Christmas. But, I’m going to assume that unless they have Word on their laptops they will not be able to pull these up to work from direct from the screen?
My apologies for the extremely late response to your questions Rhoda as we are well past Christmas now! What an incredibly thoughtful gift for your granddaughters!!
Your granddaughters could still pull up your cookbook on their laptops without Microsoft Word if you save it as a PDF.
I hope this helps you next time!
Hi Julie, I subscribed but never received a confirmation email with the cookbook template download.
Am I missing something here?
Grace Bowman
My apologies for the lag in responding to your question.
If you click on “cookbook template” (circled in black) in the post, it will automatically download your template. You may have to allow downloads or pause any popup blocker.
Hi there! I just came across your how-to video on Youtube. Did you add any pictures to your cookbook? I am wanting to create a family cookbook, however pictures would be a huge part of it. I wanted to know if pictures would work in the template you designed.
Hi Lisa,
I’ve been playing around with my template quite a bit and hoping to find an easy way to add photos. After all my time messing with the template, the good news is that you CAN insert a picture. However, the bad news is it will take some tinkering in the template current version.
If you’re up for it, here is what you can do. Click the “Insert” tab and click on “Pictures”. Once you insert your photo, you’ll need to right-click the photo and select to adjust layout. Depending on how you want your photo to be included, you would adjust the position and text wrapping tabs. You can also crop the image so it is the correct size you need for your cookbook.
In my version shown, I updated the Recipe Title (Heading 3 in the template Style) so the title would be centered. My image position (from adjusting the layout) is set to allow overlap and move with text. Text Wrapping is tight. I did this so I can shift my image to the left or right of the page. Now whenever I add a new photo, I copy and paste the image that is formated correctly and those characteristics will be applied to all future images. All I need to do is update the photo that is being pulled in for the recipe.
NOTE: The grey/green box was inserted in the header section of the document so it will be on every page (but this was strictly for aesthetics).
Now if you’d made it all this way, I think there may be an easier way to insert photos into the cookbook but it would require tables. I’ll keep messing around and may put up a new post about the options for getting photos in there. I hope this helps in the meantime!
Thank You! And I will watch your page for updates. I haven’t downloaded and started to use your template yet, but I plan to soon!
Thank you so much for sharing with us! I wanted to go through my recipes and put them into a book and now with your instructions I can and it will look amazing with the pictures I have been taking after cooking.
Thank you Sherri! Happy cookbook making! 🙂
I don’t see a place to download the template. Could you point me towards that link? I am a subscriber I didn’t see it in the free downloads section either. I’m excited to try putting together my own cookbook!
Thanks so much!
Hi Emily, the subscribers page is located, https://thenewlighterlife.com/welcome-to-our-free-printables/ You will be able to download the template from this post or from the printables page linked in my comment. Hope this helps!! Thank you!
Where is the actual downloadable template? I am only seeing instructions on here.
Okay I see it now.
I’ve made cook books in MSWord and Publisher. Both work great. Neither are hard to do. Turned out well. Oh, and I printed them out at home and bound them at home. Awesome!
Yes! It’s great to hear from another DIY cookbook maker! I’m curious, what kind of binder do you use?