Tin Whistle Case Tutorial
This beginner-friendly tin whistle case pattern is quick, simple, and perfect for making multiple cases. The case is sized for a standard tin whistle, with fleece for cushioning and a secure button closure. Customize with tags or embellishments for a personal touch!

Supplies:
- 1/8 yard fleece fabric
- 1/8 yard cotton fabric (choose a fun print for flair!)
- Matching thread
- 1 medium button (1/2″–3/4″ diameter)
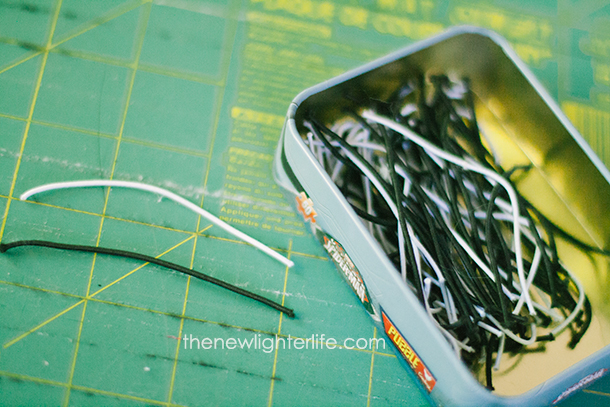
- 3″ of 1/8″ wide elastic (see note below)
NOTE: I originally used the elastic cord but due to the fact that the cord is so narrow, it’s difficult for the stitches to “grab” the cord. I repaired a couple of cases with thicker, (but still narrow elastic). The pictures below show the elastic cord but I highly recommend you use 1/8″ wide elastic instead.
Cut 3 inches of elastic cord, set aside.
Tools:
- Sewing machine
- Fabric scissors
- Straight pins
- Iron and ironing board
- Fabric marker or chalk
- Round object (e.g., mason jar or small bowl) for tracing semi-circle
- Ruler or measuring tape
- Hand-sewing needle
Instructions:
Cut Fabric Strips
From both fleece and cotton, cut one strip measuring 3.5″ wide x 27″ long, ideally along the fabric’s length for consistency.
Prepare Elastic Loop
Cut a 3″ piece of 1/8″ wide elastic. Fold in half to form a loop and set aside.
Layer Fabrics
Place the fleece strip flat. Lay the cotton strip on top, right side facing the fleece (wrong side up), aligning all edges.
Mark and Pin Elastic
At one end of the fabric, trace a semi-circle using a mason jar or small bowl as a guide.
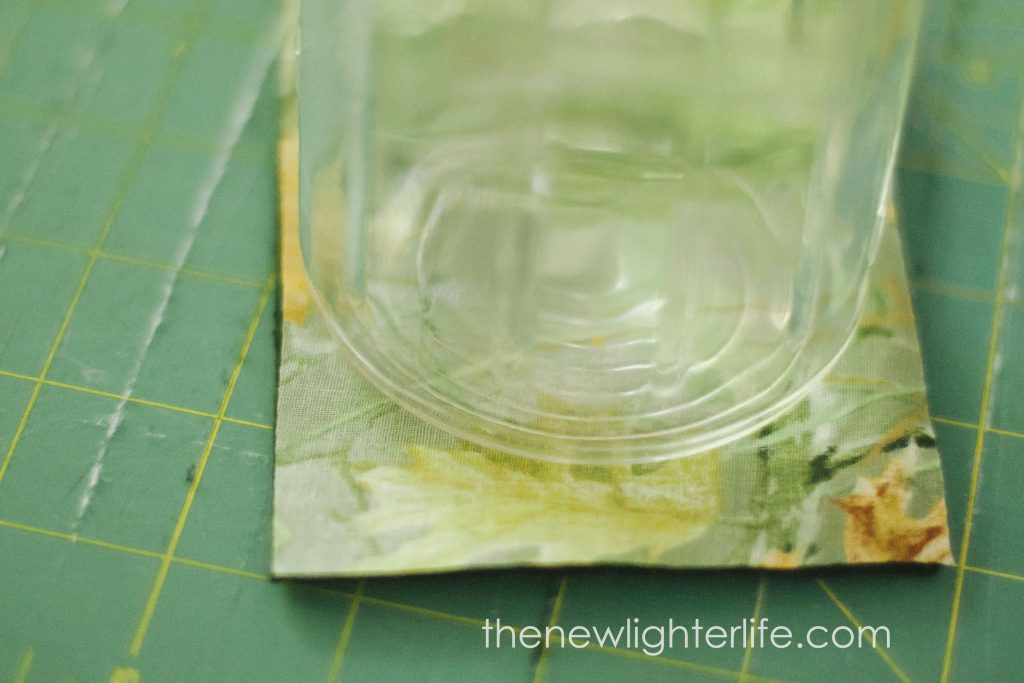

Position the elastic loop between the fabric layers at the semi-circle end, with the loop inside and cut ends flush with the fabric edge. Secure with two pins, one on each side of the elastic, to hold it in place.
Sew Main Seam
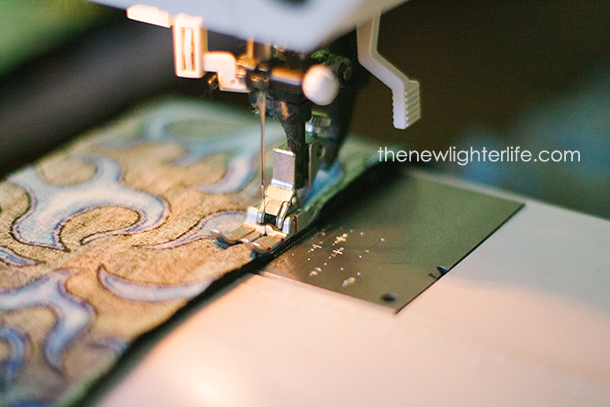
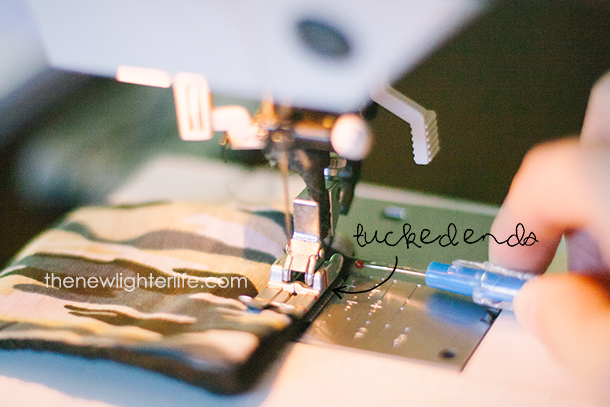
Starting at the straight (unmarked) end, sew a 1/4″ seam along both long sides and around the semi-circle, leaving the straight end open.
When stitching over the elastic, reinforce by sewing back and forth 3–4 times to ensure it’s secure.
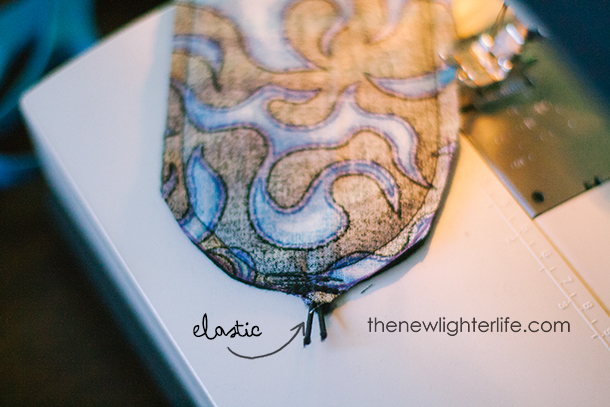
Trim the curved end to a 1/8″ seam allowance, leaving the elastic ends intact for potential repairs.
Turn and Press
Turn the fabric tube right side out through the open end.
Iron flat, pressing seams to create a smooth, professional shape.
Close Open End
Fold the raw edges of the open end inward by 1/4″. Sew a 1/4″ seam to close it neatly.
Form the Pocket
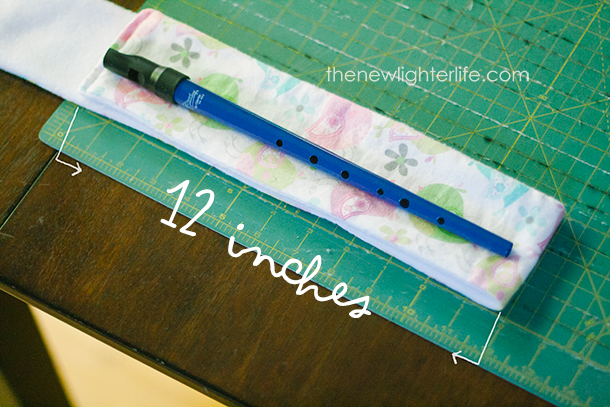
Lay the case flat. Fold the straight end up to form a 12″ pocket (measure from fold to pocket opening). Pin if needed to hold the fold.
Attach Button
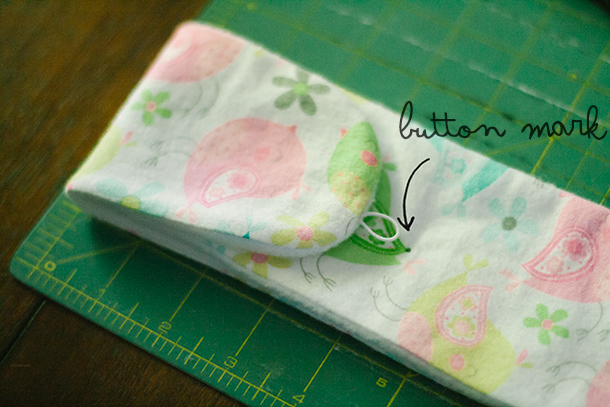
Fold the semi-circle flap over the pocket. Note where the elastic loop rests, then mark a spot 1/4″–1/2″ beyond it for the button.
Hand-sew the button securely at the marked spot.
Final Stitching
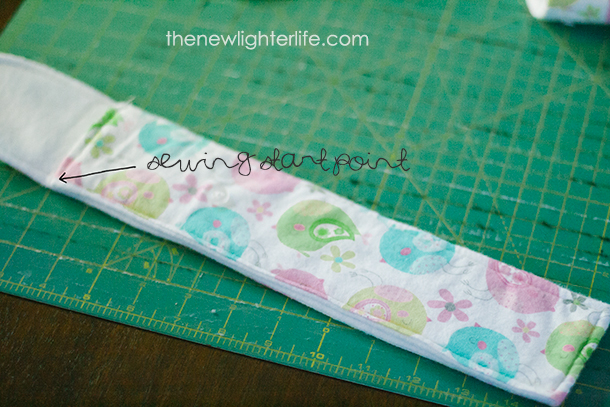
With the pocket folded to 12″ and flap down, sew a 1/4″ seam around the entire case, starting and ending at the pocket opening. Backstitch at both ends for durability.
Notes:
- This case fits standard tin whistles and provides soft, protective padding.
- Ideal for bulk projects like fundraisers—I made 30 in one go!
- Customize with embroidered initials, fabric appliqués, or a name tag sewn into the pocket.
Tips:
- Choose a sturdy button and test the elastic loop for a snug fit before sewing.
- If the elastic feels loose, trim it to 2.5″ before folding.
- For extra strength, double-stitch the final seam or use a decorative stitch.
- Pre-wash fabrics to prevent shrinkage, especially for cotton.
Why You’ll Love This Project:
This tin whistle case is a perfect blend of function and fun. It’s quick to sew, budget-friendly, and endlessly customizable—add patches, embroidery, or even a keychain loop for extra flair. Whether you’re crafting for yourself, your kids, or a community event, this project is a crowd-pleaser!

Tin Whistle Case Tutorial
Equipment
- Sewing machine
- Scissors
- Pins
- Iron and ironing board
- Fabric marker or chalk
- Round object (e.g., mason jar) for tracing semi-circle
- Ruler or measuring tape
- Hand-sewing needle
Materials
- ⅛ yard fleece fabric
- ⅛ yard cotton fabric
- matching thread
- 1 button, medium size, about 1/2"–3/4"
- 3 inches ⅛" wide elastic avoid thinner elastic cord pictured for better stitching durability
Instructions
- Cut Fabric Strips: Cut one 3.5" x 27" strip from both the fleece and cotton fabric along the length of the material.
- Prepare Elastic: Cut a 3" piece of 1/8" wide elastic. Fold it in half to form a loop and set aside.
- Layer Fabrics: Place the fleece strip on the bottom. Lay the cotton strip on top, right side facing the fleece (wrong side up).
- Mark and Pin Elastic: At one end of the fabric layers, trace a semi-circle using a mason jar or similar round object.
- Assemble: Place the folded elastic loop between the fabric layers at the semi-circle end, with the loop inside and the cut ends aligned with the fabric edge. Secure with two pins, one on each side of the elastic, to prevent shifting.
- Sew Main Seam: Starting at the unmarked (straight) end, sew a 1/4" seam allowance along the long sides and around the semi-circle end, leaving the straight end open. When sewing over the elastic, reinforce by stitching back and forth multiple times to ensure it’s secure.
- Trim: Trim excess fabric around the curved end, leaving a small margin (about 1/8") and keeping the elastic ends intact for potential repairs.
- Turn: Turn the fabric tube right side out through the open end.
- Iron: Press with an iron to flatten and shape the case, ensuring the seams are smooth.
- Close Open End: Fold the raw edges of the open end inward by 1/4". Sew a 1/4" seam to close.
- Form Pocket: Lay the case flat. Fold the straight end up to create a pocket 12" long from the fold to the opening. Pin in place if needed.
- Mark and Attach Button: Fold the semi-circle flap over the pocket. Mark where the elastic loop rests on the flap, then move slightly past (about 1/4"–1/2") to mark the button placement. Hand-sew the button securely at the marked spot.
- Final Stitching: With the pocket still folded to 12" and the flap folded down, sew a 1/4" seam around the entire case, starting and ending at the pocket opening. Backstitch at the start and end for durability.
Notes
- This pattern yields a padded case perfect for tin whistles.
- For personalization, add a name tag or decorative stitching before the final seam.
- This method is efficient for bulk sewing—great for fundraisers or group projects!
Tips:
- Test the button placement to ensure the elastic loop reaches comfortably without stretching too tightly.
- If the elastic feels too loose, shorten it slightly before sewing.
For extra durability, double-stitch the final seam around the case.
Happy sewing!
As an Amazon Associate, I earn from qualifying purchases at no extra cost to you. Thank you for your support!
Very cute! Simple ,fast,and useful … I like it! Thanks!
Hi there, I just tried making this bag – awesome tutorial! But one thing I am wondering. When I cut my fabric 24 inches, I didn’t have enough to make the flap. I see on your picture that there seems to be an extra 3 inches for the flap – so should I be cutting my fabric 27 or 28 inches long initially? Thanks! 🙂
Oops! That was a typo! I updated the tutorial to read 27 inches as that was actually how long it should have been cut. So sorry!
I also updated the tutorial for a different type of elastic, I now recommend 1/8″ wide elastic as it’s more secure and less likely to slip out of the cover. Hope this helps!
We made these today and they turned out great! We substituted cut hair elastics for the regular elastic and it worked just fine. It gave it a cute pop of color too. Thanks for this tutorial. We can’t wait to show all of our CC friends our cute cases.
Yay!! So glad this worked for you Michellle!
I am going to try to make myself one of these but add a strap.
I have made several of these. The 27 inch measurement is fine for Clark whistles. Other whistles are a bit longer, and 28 inches seems to fit better. Also, I found that if I made the first seams narrow (scant 1/4″) and the final stitching a bit wider, it fit under my walking foot better and the final edges looked prettier. It doesn’t much matter if you are using similar colors for the cotton and the fleece, but I wanted a dark outer and a light fleece, so the layering became a bit more fussy.
Thank you so much for the information Vick!
How do I print this without advertisements?
Hi Charity! Thank you for your comment! I’ve made a few updates and added a printable pattern to this post. Happy sewing!