Quick, Easy, & Delicious Cream Cheese Danish
There’s something undeniably magical about biting into a warm, flaky cream cheese Danish fresh from the oven. For over 20 years, this quick and easy recipe has been a staple in my kitchen, and I’m thrilled to share it with you today! This recipe comes from the same dear friend who gave me my beloved oatmeal dinner rolls, and just like that gem, this Danish has earned a permanent spot in my recipe box. With buttery crescent roll dough, a creamy, tangy filling, and a sprinkle of cinnamon-sugar, it’s no wonder this Danish is a family favorite—especially for birthday breakfasts!
Now, can I let you in on a little secret? We’ve been enjoying this Danish as a breakfast dessert for years. Is a Danish supposed to be for breakfast or dessert? Honestly, I’m not sure, but in our house, it’s a morning indulgence we shamelessly adore. It’s one of three breakfast treats that dominate our special occasions, alongside my homemade cinnamon rolls and cinnamon streusel coffee cake. Clearly, we’re a family that loves our sweet breakfasts!
This cream cheese Danish is not only delicious but also incredibly easy, thanks to a shortcut: store-bought crescent roll dough. With just a handful of ingredients and a simple braiding technique, you can create a bakery-worthy pastry that looks as good as it tastes. Whether you’re a beginner baker or a seasoned pro, this recipe is guaranteed to impress. Let’s dive in!
Why You’ll Love This Cream Cheese Danish
- Quick & Easy: Ready in just 35 minutes, this recipe uses crescent roll dough for a fuss-free prep.
- Flaky & Creamy: The buttery, golden dough pairs perfectly with the smooth, tangy cream cheese filling.
- Family Favorite: It’s a crowd-pleaser for breakfast, brunch, or even dessert, and it’s forgiving even if your braiding isn’t perfect!
- Customizable: Add a glaze for a fancier look or stick with the classic cinnamon-sugar sprinkle for simplicity.
What You Need for Cream Cheese Danish
This recipe keeps things simple with just a few ingredients. Here’s the lineup:
- Cream Cheese: Full-fat cream cheese gives the filling its rich, creamy texture. Make sure it’s softened to room temperature for a smooth consistency.
- Flour & Sugar: These add structure and sweetness to the filling, balancing the tanginess of the cream cheese.
- Egg & Vanilla Extract: The egg helps set the filling, while vanilla adds a warm, aromatic note.
- Crescent Roll Dough: The star of this shortcut recipe! I recommend seamless crescent roll sheets for easy prep, but perforated rolls work too if you pinch the seams.
- Cinnamon-Sugar Sprinkle: A simple mix of sugar and cinnamon adds a cozy, sweet crunch right after baking.
- Optional Glaze: For a bakery-style finish, a quick powdered sugar glaze takes this Danish to the next level.
How to Make a Cream Cheese Danish
The beauty of this recipe lies in its simplicity and the braid that’s easier than it looks. Here’s a quick overview, with the full recipe below:
- Mix the Filling: Beat together cream cheese, flour, sugar, egg, and vanilla until smooth and creamy.
- Prep the Dough: Unroll the crescent dough, roll it into a 10×14-inch rectangle, and cut strips along the sides for braiding.
- Assemble: Spread the filling down the center, fold the ends to create a “boat,” and braid the strips over the filling.
- Bake & Finish: Bake until golden, sprinkle with cinnamon-sugar, and add an optional glaze for extra flair.
The result? A gorgeous, flaky Danish that tastes like it came from a bakery but takes minimal effort!
Success Tips for the Perfect Danish
Over the years, I’ve picked up a few tricks to make this Danish even better:
- Use Seamless Crescent Dough: If you can find seamless crescent roll sheets, they’re a game-changer for easy prep. If using perforated rolls, pinch those seams tightly to prevent leaks.
- Parchment or Silicone Mat: Line your baking sheet with parchment paper or a silicone mat. This makes it easier to roll out the dough and transfer it to the pan without worrying about the pan’s edges.
- Don’t Stress the Braid: The braiding process is forgiving. If your strips are uneven or you get a little “cut-happy” with the pizza cutter, it’ll still look and taste amazing.
- Serve Warm: This Danish is at its best when warm and fresh from the oven. Leftovers? Pop them in the microwave for 15 seconds to revive that just-baked magic.
The Braiding Technique
The braided look might seem intimidating, but it’s surprisingly simple! After rolling out the dough, use a pizza cutter or knife to cut 1-inch-wide strips along both long sides, about 2–3 inches deep. Spread the filling down the center, fold the short ends over to create a “boat,” then alternate folding the strips over the filling to form a braid. Tuck any loose ends underneath, and you’re ready to bake! The dough is forgiving, so don’t worry if it’s not perfect—it’ll still be delicious.


Make It Your Own
While we love the classic cinnamon-sugar sprinkle, you can dress up this Danish for special occasions.
- Simple Glaze: Drizzle it with a delicious glaze (recipe included below) for a gorgeous, bakery-style finish.
- Added Fruit: Try spreading a thin layer of fruit preserves (like raspberry or blueberry) on top of the cream cheese filling or sprinkle chopped pecans over the top for extra crunch.
- Nuts: Add slivered almonds to the top of danish before baking.
Storing & Reheating
This Danish is best enjoyed warm, but if you have leftovers, store them in an airtight container in the refrigerator for up to 3 days. To reheat, microwave individual slices for 15 seconds to restore that fresh-baked warmth. You can also freeze the baked Danish (without glaze) for up to 1 month. Wrap it tightly in plastic wrap and place it in a ziploc bag. Thaw in the refrigerator overnight and reheat in a 300°F oven for 10 minutes.
Final Thoughts
This Danish is perfect for cozy mornings, special occasions, or anytime you want a sweet, flaky treat. I can’t wait for you to try it! Let me know in the comments how it turns out, or share your favorite breakfast treats!
Quick, Easy, & Delicious Cream Cheese Danish
Print Recipe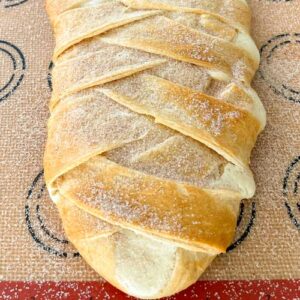
EQUIPMENT (affiliate links)
- stand mixer with paddle attachment, optional
- kitchen scale for best accuracy
Ingredients
Cream Cheese Filling:
- 8 oz full-fat cream cheese, softened to room temperature 227g
- ½ cup unbleached all-purpose flour, spooned and leveled 60g
- ½ cup 100g granulated sugar 100g
- 1 large egg, at room temperature
- ½ tsp pure vanilla extract
Dough:
- 1 tube refrigerated crescent roll dough (preferably seamless sheet)
Cinnamon-Sugar Sprinkle:
- 2 tbsp granulated sugar 25g
- ½ tsp ground cinnamon
Optional Glaze:
- ½ cup confectioners’ sugar, sifted 60g
- 1-2 tbsp milk or heavy cream 15-30g
- ¼ tsp vanilla extract
Instructions
- Preheat Oven: Preheat your oven to 375°F (190°C). Line a half-sheet pan with parchment paper or a silicone baking mat.
- Make Filling: In a medium bowl, beat the cream cheese, flour, sugar, egg, and vanilla with a hand mixer or stand mixer (paddle attachment) on medium speed until smooth, about 1–2 minutes. Set aside.
- Prepare Dough: Unroll the crescent dough onto the prepared pan. If using perforated rolls, pinch seams together. Lightly dust with flour and roll into a 10×14-inch rectangle.
- Cut Strips: Using a pizza cutter or knife, cut 1-inch-wide strips along both long sides, about 2–3 inches deep toward the center.
- Add Filling: Spoon the cream cheese filling down the center of the dough, spreading it evenly (about 2–3 inches wide).
- Braid Dough: Fold the short ends over the filling to form a “boat.” Starting at one end, alternate folding left and right strips over the filling at a slight angle to create a braid. Tuck loose ends under.
- Bake: Bake for 20–25 minutes, until the dough is lightly golden brown.
- Add Cinnamon-Sugar: Mix the cinnamon and sugar in a small bowl. Sprinkle evenly over the hot Danish right after baking.
- Optional Glaze: For a fancier look, whisk confectioners’ sugar, 1 tablespoon milk, and vanilla until smooth. Adjust with more milk if needed. Drizzle over the cooled Danish.
- Serve: Slice into 6 pieces and serve warm. Store leftovers in the refrigerator for up to 3 days; reheat in the microwave for 15 seconds.
Notes
- Seamless Dough: Seamless crescent roll sheets save time, but perforated rolls work if you pinch the seams well.
- Make Ahead: Prepare the filling up to 2 days in advance and refrigerate. Assemble and bake the day of serving.
- Freezing: Freeze the baked (unglazed) Danish, wrapped tightly, for up to 1 month. Thaw in the fridge overnight and reheat at 300°F for 10 minutes.
As an Amazon Associate, I earn from qualifying purchases at no extra cost to you. Thank you for your support!
One Comment