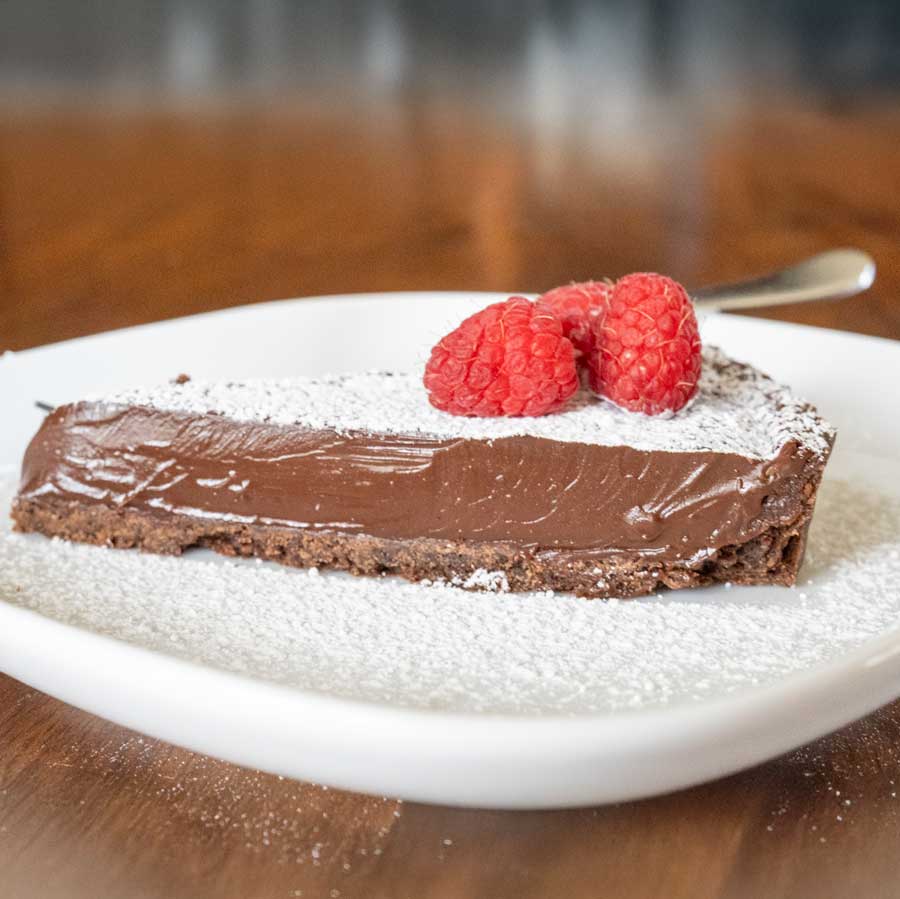
Decadent Chocolate Tart Recipe
You might be missing out on the ultimate spring dessert—a silky semi-sweet chocolate tart with a crisp espresso cocoa crust, topped with dreamy stabilized whipped cream! Spring is bursting with reasons to gather—Easter brunches, Mother’s Day teas, or just sunny afternoons with friends—and nothing says celebration quite like chocolate. This Decadent Chocolate Tart recipe is my go-to dessert for these moments, with a crisp, espresso-kissed cocoa crust and a silky, semi-sweet ganache that melts in your mouth. Topped with a cloud of stabilized whipped cream, it’s as beautiful as it is indulgent, perfect for dressing up your spring table. Whether you’re hosting a festive spread or sneaking a slice with coffee, this tart is sure to steal hearts. Let’s dive into why it’s a must-make and how to nail it every time!
Why You’ll Love This Chocolate Tart Recipe
This tart is all about balance: a buttery crust with a hint of mocha depth, a rich yet sweet chocolate filling, and a creamy whipped topping that holds its shape for picture-perfect slices. It’s surprisingly easy to make, thanks to a few pro tricks (like freezing the dough and a clever parchment hack), and it’s versatile enough for any spring occasion. I’ve tested a few versions—one with a slightly darker chocolate vibe—but landed on this 50–55% cacao filling for its crowd-pleasing sweetness that’s just right for spring’s fresh, joyful energy. Plus, you can make it ahead, leaving you more time to enjoy the party!

Major Ingredients for this Decadent Chocolate Tart
Here’s a look at the key players in this tart and why they’re essential for its decadent texture and flavor:
- Heavy Cream: Combines with chocolate to create a creamy, firm ganache that holds clean slices while staying silky.
- All-Purpose Flour : The backbone of the crust, flour provides structure and a tender, crisp texture when mixed with butter and chilled properly.
- Dutch-Processed Cocoa Powder: Adds rich chocolate flavor and a deep, dark color to the crust, with a smooth, less acidic taste that pairs perfectly with espresso.
- Instant Espresso Powder: Brings a subtle mocha depth to the crust, enhancing the chocolate without overpowering the tart’s sweetness.
- Salted Butter: In the crust, cold butter creates flakiness and richness; in the ganache, softened butter adds gloss and a velvety mouthfeel.
- 50–55% Cacao Chocolate Chips: The star of the ganache, these semi-sweet chips deliver a sweet, truffle-like flavor that’s rich but not bitter, melting into a smooth filling.
How to Get a Minimal-Shrink Tart Crust
Getting a perfectly shaped tart crust that doesn’t slump or shrink during baking is easier than you think. Here are my tried-and-true techniques to keep your espresso cocoa crust crisp and flawless:
- Use White Wine Vinegar: Adding 1 ½ teaspoons of white wine vinegar to the dough weakens gluten development. This makes the crust tender and less likely to contract when baked. Don’t worry—you won’t taste it in the final tart!
- Chill the Dough: Refrigerating the dough disk for 30 minutes before rolling to firm up the butter and relax the gluten.
- Freeze the Shaped Crust: Freezing the dough in the tart pan for 1 hour locks in its shape. This step is a game-changer for a professional look.
- Prick the Crust: Piercing the crust bottom with a fork (before adding parchment and weights) allows steam to escape.
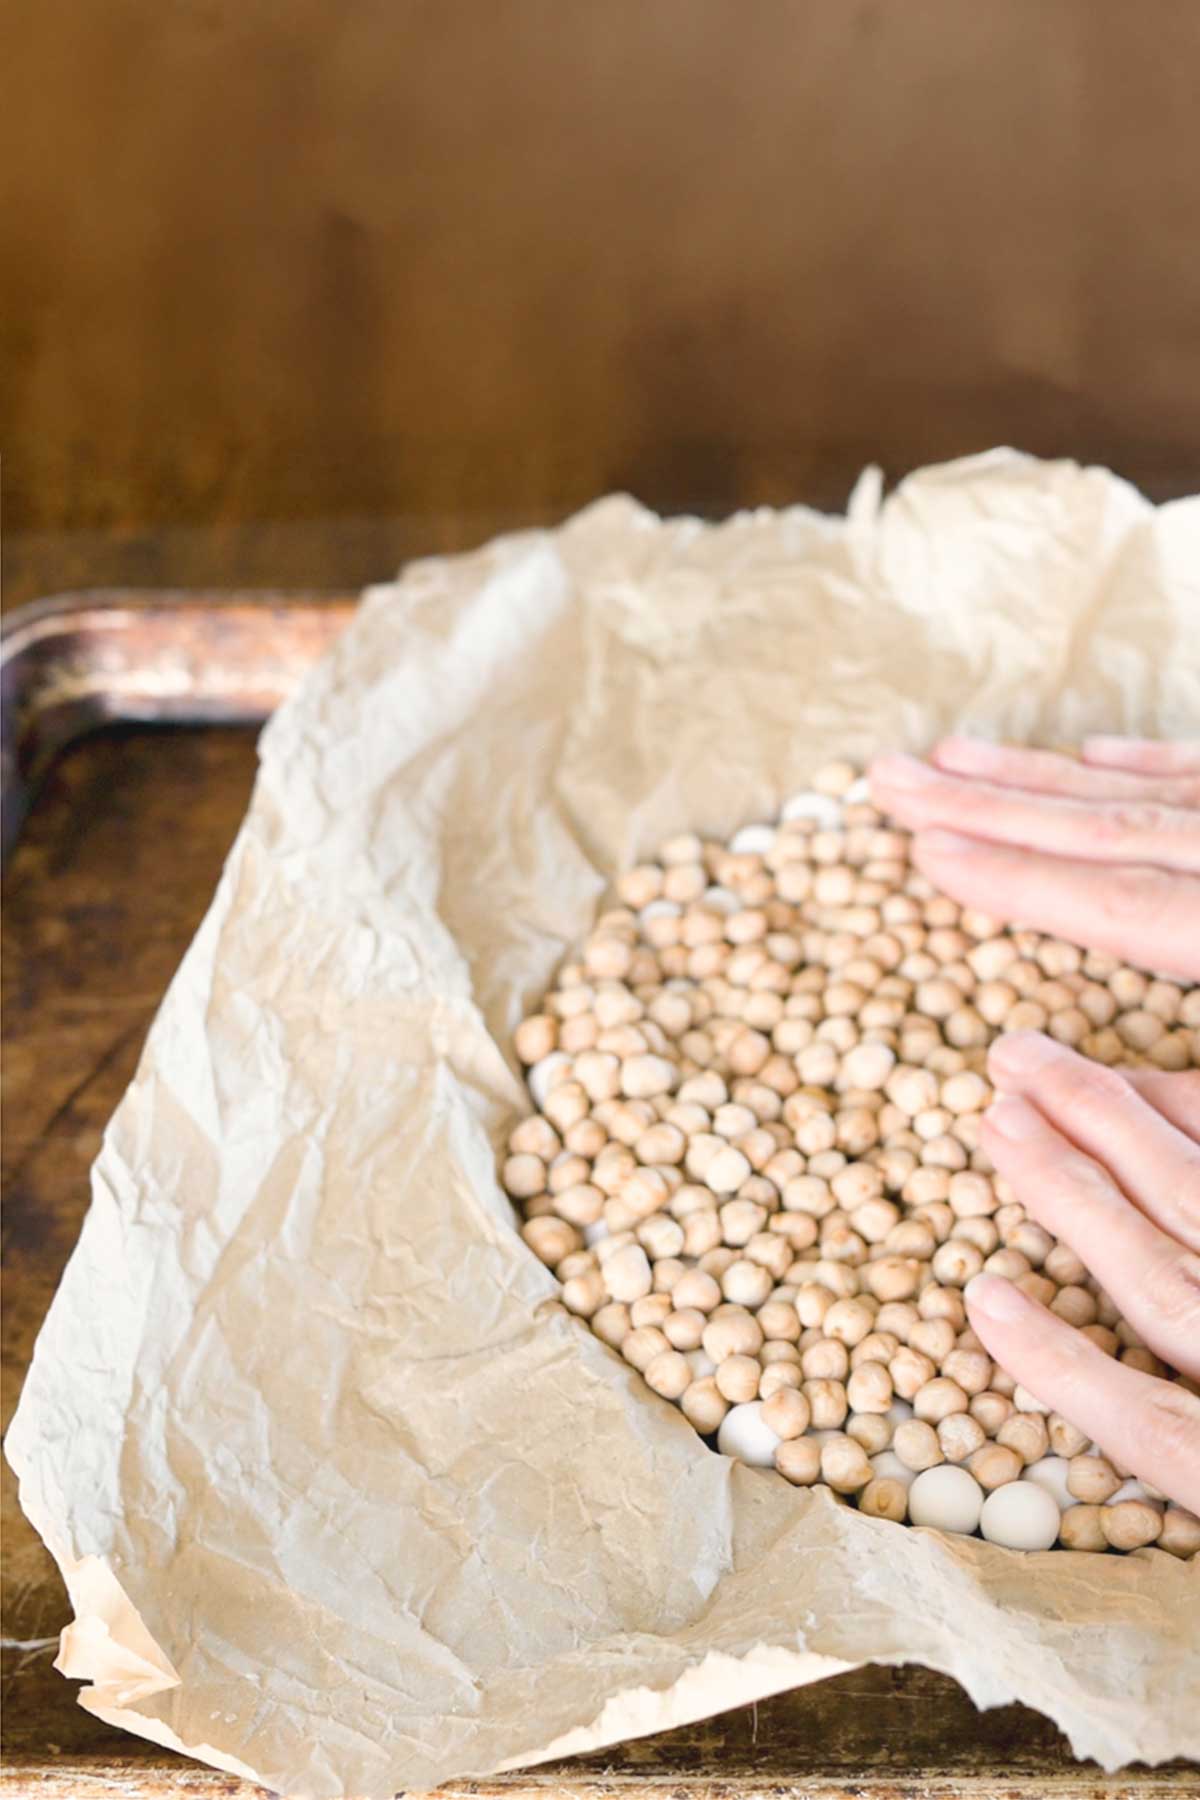
- Use Wet Parchment and Weights: Lining the crust with wet, scrunched, and dried parchment molds it perfectly to the pan’s edges. Pie weights, dried beans, or a combination hold the dough firmly in place during the initial bake, maintaining its structure.
- Bake Properly: Baking with weights for 18 minutes sets the edges. An additional baking time of 8–10 minutes without weights makes sure the center is fully cooked and firm and won’t collapse when cooling.
With these tips, your decadent chocolate tart crust will hold its shape like a bakery pro, ready to cradle that silky ganache!
Tips for Success
- Crust Handling: Removing the crust before filling gives a pro look, but handle it gently! Use a flat plate and check for cracks to keep the ganache contained. If you prefer extra security, keep it in the pan until the ganache sets.
- Chocolate Choice: The 50–55% cacao chips make this tart sweet and approachable. But if you want it even sweeter, stir 1–2 tablespoons of sugar into the cream while heating.
- Whipped Cream: The xanthan gum keeps the cream picture-perfect for hours—great for making ahead. Whip it fresh for the best texture, and refrigerate any piped tart briefly if needed.
- Spring Flair: Raspberries add a tart, colorful contrast, while milk chocolate shavings scream indulgence. For Easter, try edible flowers or pastel sprinkles!
Storing You Decadent Chocolate Tart
- Fridge: Store the ungarnished tart, wrapped or in an airtight container, for up to 3 days. With stabilized whipped cream, cover gently (a cake dome works great) and refrigerate for up to 2 days. Bring to room temp (~30–60 minutes) before serving for that melt-in-your-mouth feel.
- Freezer: Wrap an ungarnished tart tightly in plastic wrap and foil for up to 1 month. Thaw in the fridge overnight, then add whipped cream before serving. Skip freezing with cream to avoid texture issues.
- Make-Ahead: Bake the crust up to 2 days ahead (keep in the pan, wrapped, at room temp) or freeze it for a month. The whole tart (ungarnished) can chill for 3 days, ready for your spring bash.
Serving Suggestions for Spring
This chocolate tart recipe is a showstopper for any spring celebration! Pair it with:
- Easter Brunch: Serve alongside fresh fruit salad and mimosas—the whipped cream and raspberries tie it to the season.
- Mother’s Day Tea: Plate with delicate sandwiches and floral teas; the tart’s elegance fits right in.
- Garden Party: Offer with iced coffee or rosé—the chocolate’s sweetness loves warm spring days.
- Dessert Table: Add pastel macarons or lemon bars for a colorful spread. Slice thinly to let everyone grab a piece!
Why It’s Perfect for Spring
Spring calls for desserts that feel light yet indulgent, and this tart delivers. The semi-sweet ganache is rich without being heavy, and the whipped cream adds a cloud-like touch that screams renewal. The espresso in the crust gives just enough sophistication to make it special, while the chocolate says “treat yourself.” Whether you’re toasting new beginnings or just savoring a sunny day, this tart brings joy to the table.
Ready to make this chocolate tart recipe for your next spring gathering? I’d love to hear how it turns out! Drop a comment below, tag me on Instagram, or share a pic of your creation. Happy baking, and here’s to sweet spring celebrations!
Decadent Chocolate Tart
Print Recipe
EQUIPMENT (affiliate links)
Ingredients
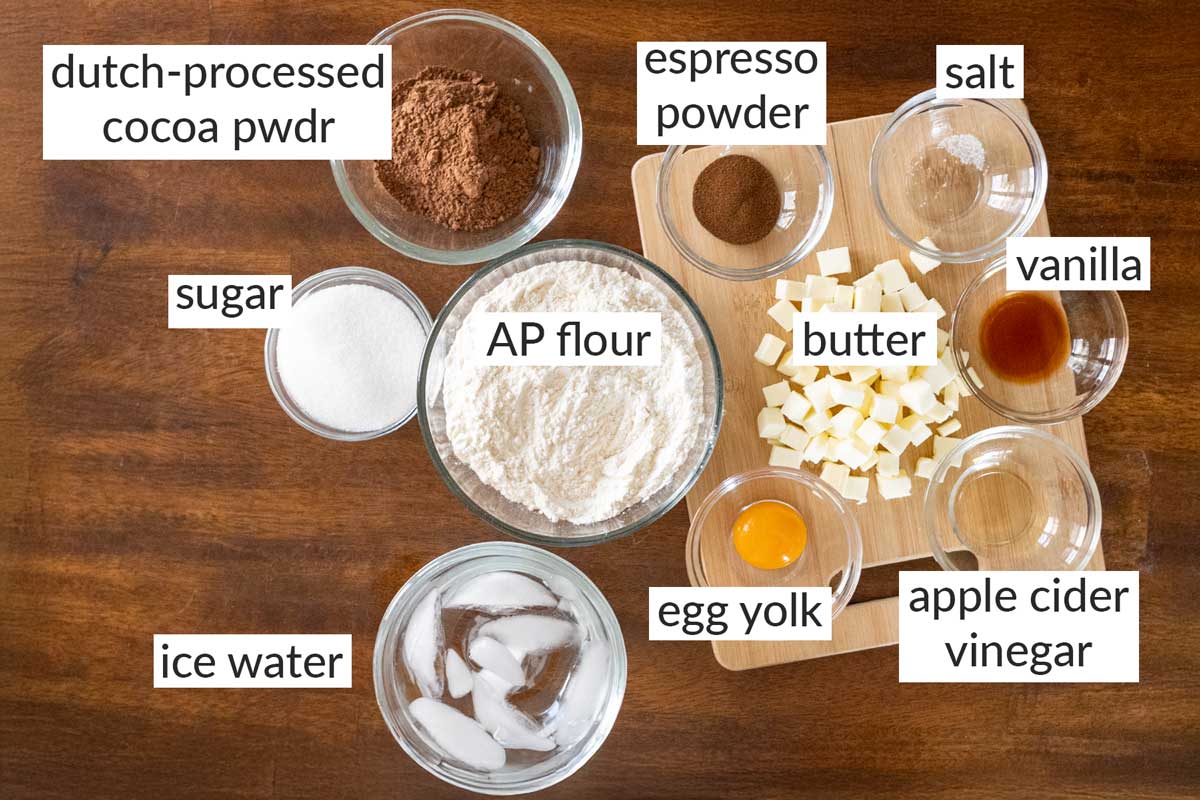
For the Espresso Cocoa Crust:
- 1 ½ c. all-purpose flour 180g
- ¼ c. Dutch-processed cocoa powder 25g
- 1 tsp. instant espresso powder
- ⅓ c. granulated sugar 65g
- ⅛ tsp. salt
- ½ c. salted butter, cold & cubed 115g
- 1 large egg yolk
- 1 ½ tsp. white wine vinegar
- 2 –3 tbsp ice water
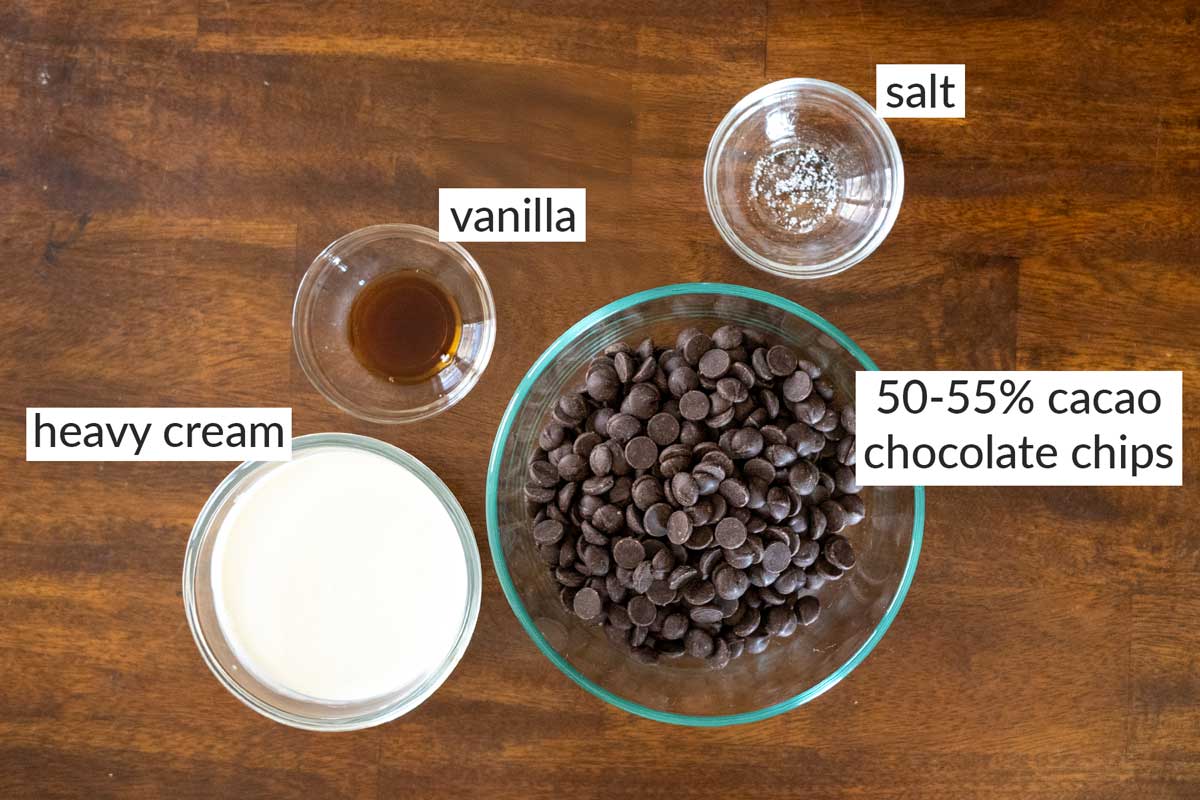
- For the Chocolate Ganache Filling:
- 12 oz. 50–55% cacao chocolate chips 340g
- 1 ⅛ c. heavy cream 270g
- 2 tbsp. salted butter, softened 30g
- 1 tsp. vanilla extract
- ⅛ tsp. of sea salt
For the Stabilized Whipped Cream Garnish:
- 1 c. heavy cream, cold 240g
- 2 tbsp. powdered sugar 15g
- ½ tsp. vanilla extract
- ¼ tsp. xanthan gum
Instructions
Espresso Cocoa Crust:
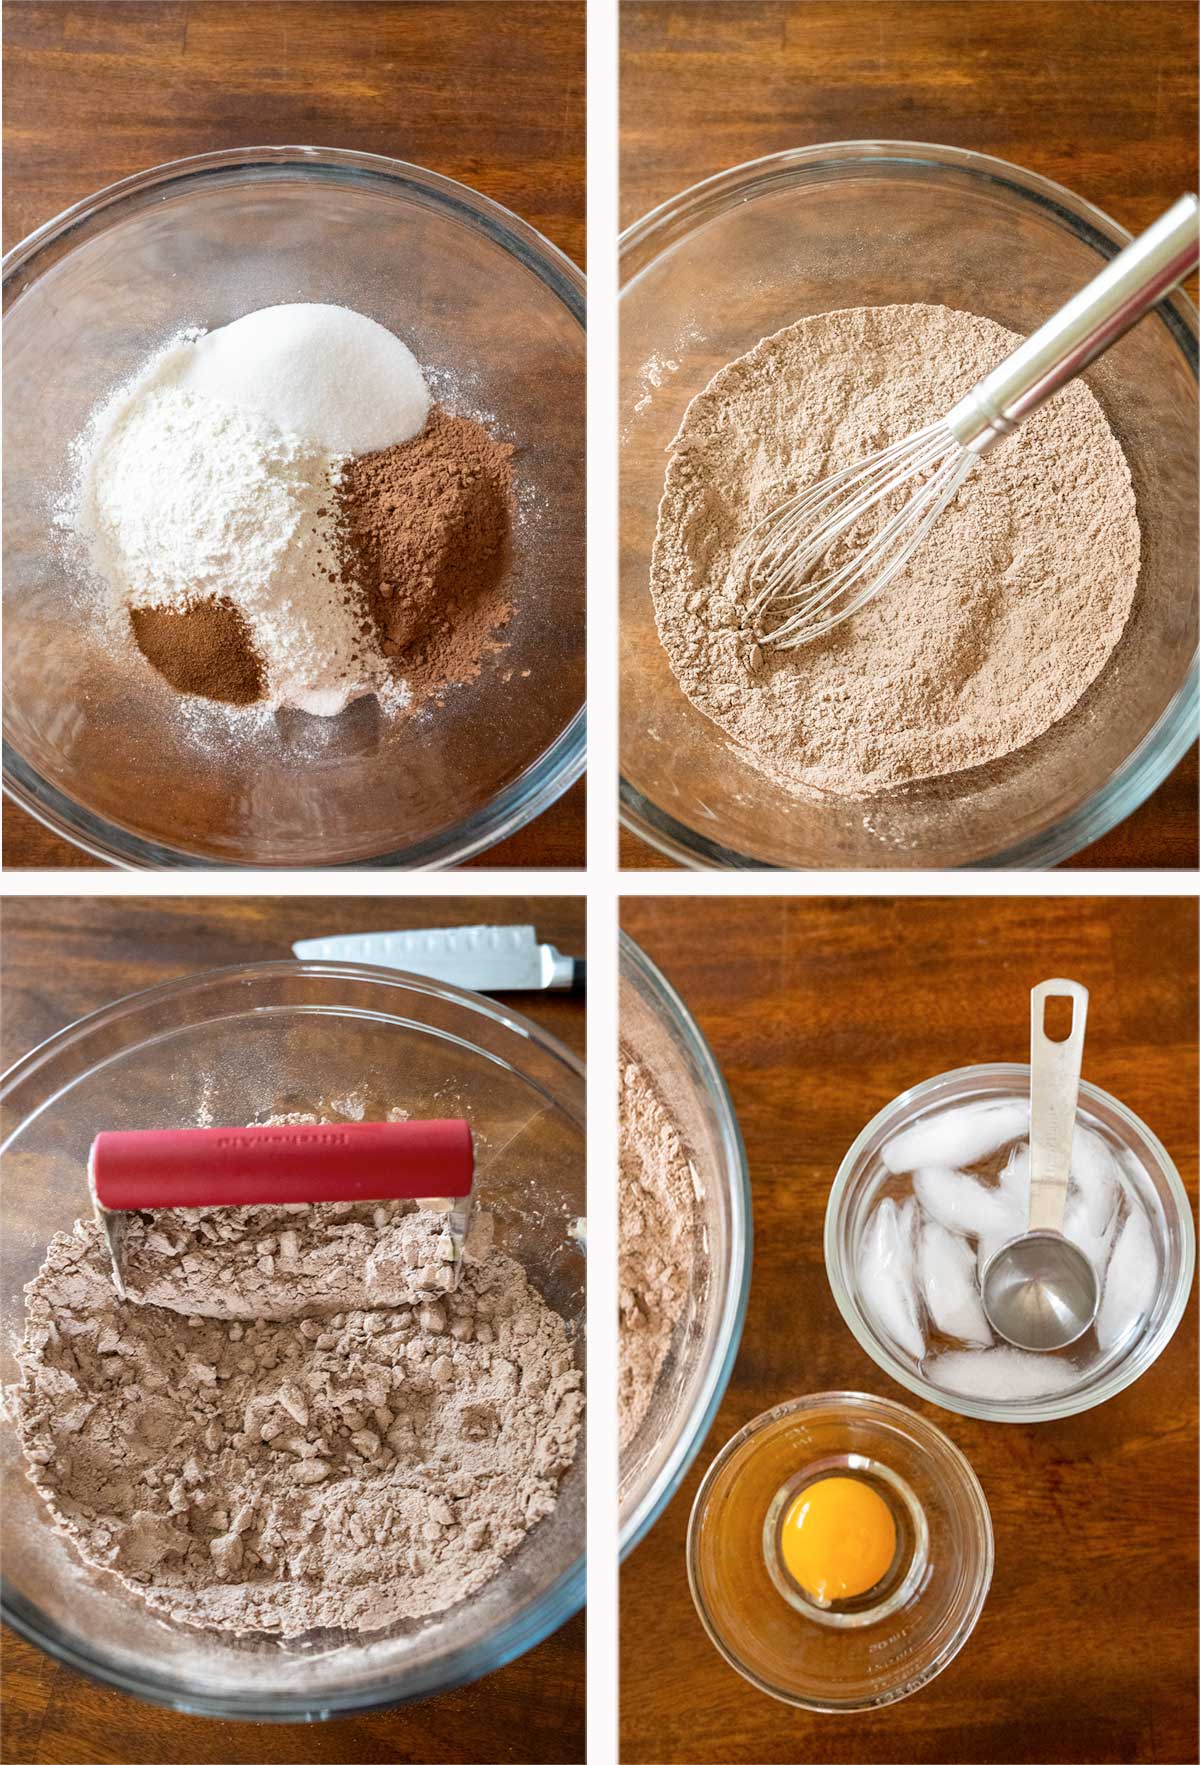
- In a large bowl, whisk 1 ½ cups all-purpose flour, ¼ cup Dutch-processed cocoa powder, 1 tsp espresso powder, ⅓ cup granulated sugar, and a pinch of salt.
- Add ½ cup cold, cubed salted butter. Use a pastry cutter or fingertips to work it into coarse crumbs with pea-sized butter pieces.
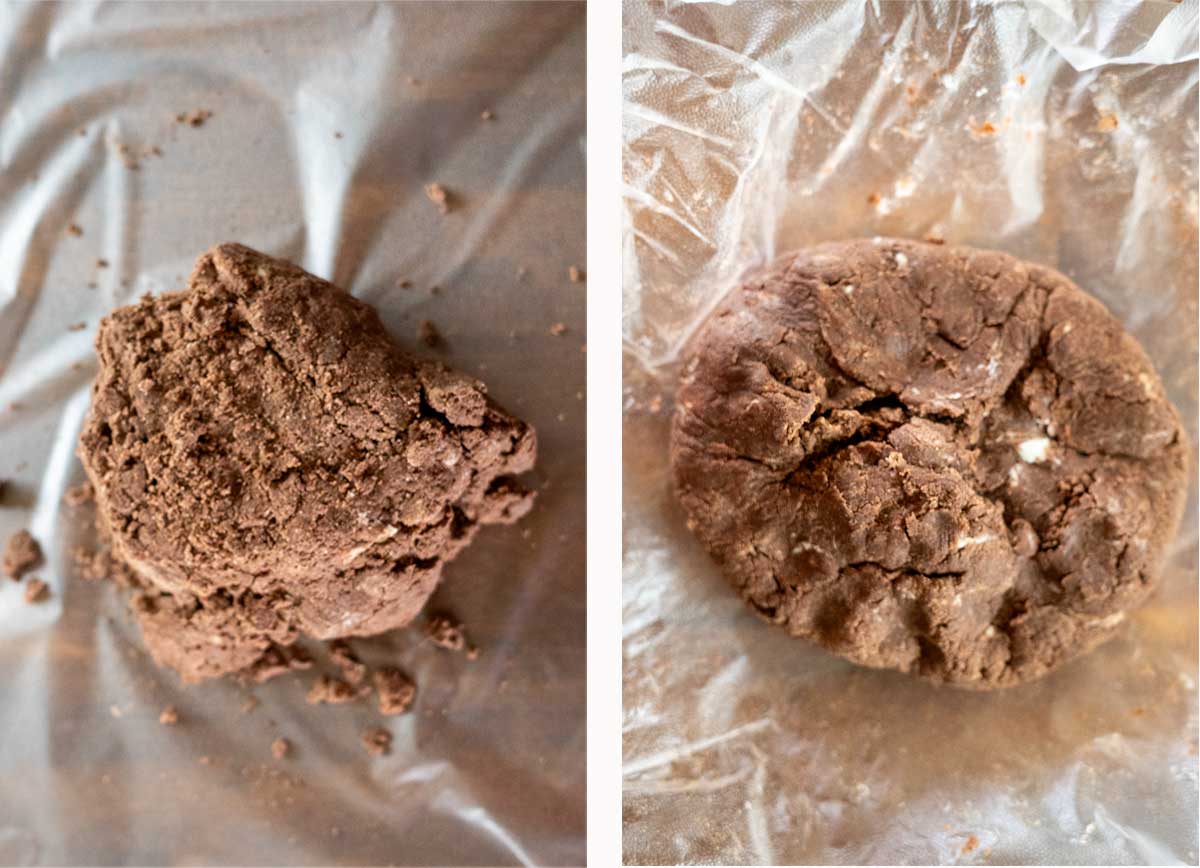
- In a small bowl, mix 1 large egg yolk, 1 ½ tsp white wine vinegar, and 2 tbsp ice water. Stir into flour mixture until dough holds together. Add up to 1 tbsp more water, 1 tsp at a time, if dry.
- Form dough into a disk, wrap in plastic wrap, and refrigerate for 30 minutes.
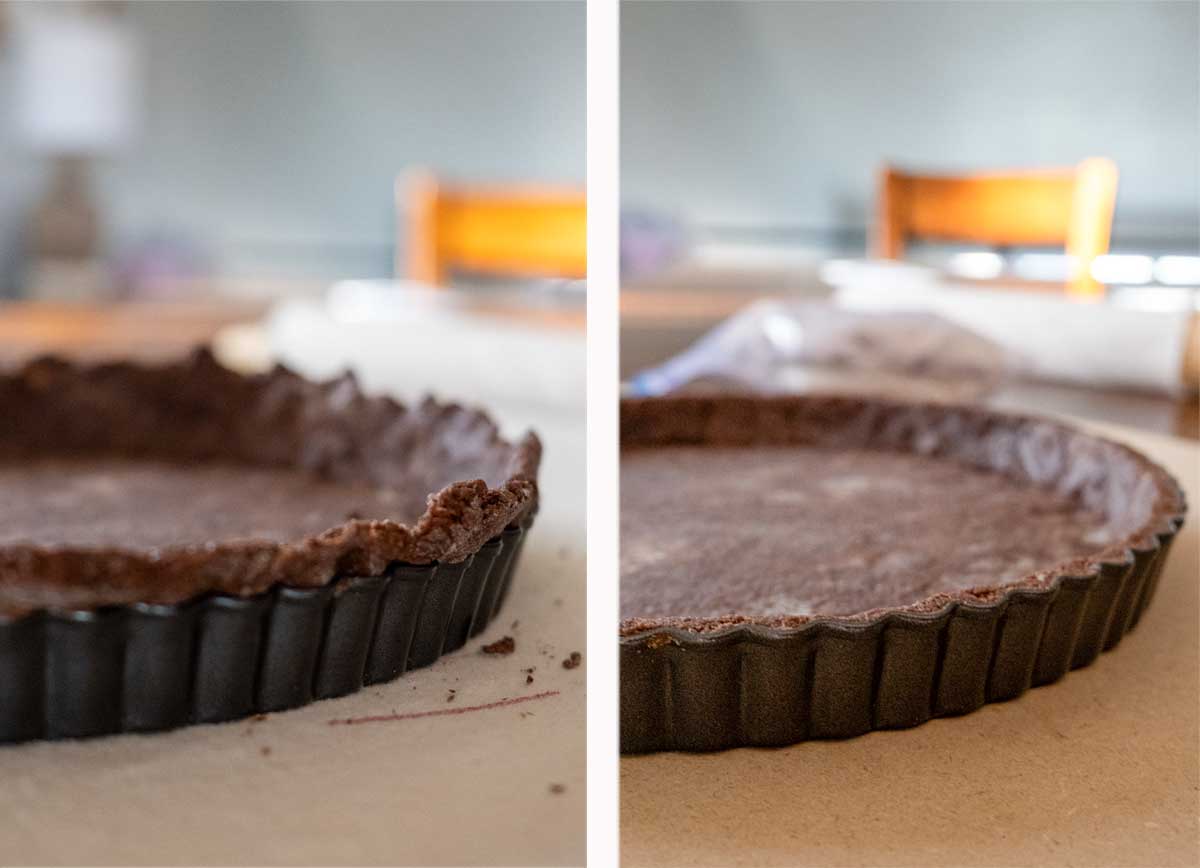
- Roll dough to ⅛-inch thickness on a lightly floured surface. Fit into a 9-inch tart pan with a removable bottom, press into edges, and trim excess.
- Freeze crust in the pan for 1 hour.
- Preheat oven to 350°F (175°C). Prick crust bottom with a fork. Wet parchment, scrunch, dry with a towel, and press into crust. Fill with pie weights or dried beans.
- Bake with weights for 18 minutes until edges feel firm and smell toasty. Remove weights and parchment; bake 8–10 minutes until center is dry and firm, with a cocoa aroma. If sticky, bake 1–2 minutes more.
- Cool crust completely in the pan (~1–2 hours). Gently push up removable bottom to lift crust from pan. Slide onto a flat, sturdy plate. Check for cracks; if any, brush with melted chocolate to seal.
Chocolate Ganache Filling:
- Place 12 oz 50–55% cacao chocolate chips in a heatproof bowl.
- Heat 1 ⅛ cups heavy cream in a saucepan over medium until simmering (no boiling).
- Pour hot cream over chocolate chips. Let sit 1–2 minutes, then stir gently until smooth. If needed, place bowl over a double boiler with barely simmering water and stir.
- Add 2 tbsp softened salted butter, 1 tsp vanilla extract, and a pinch of sea salt. Stir until glossy.
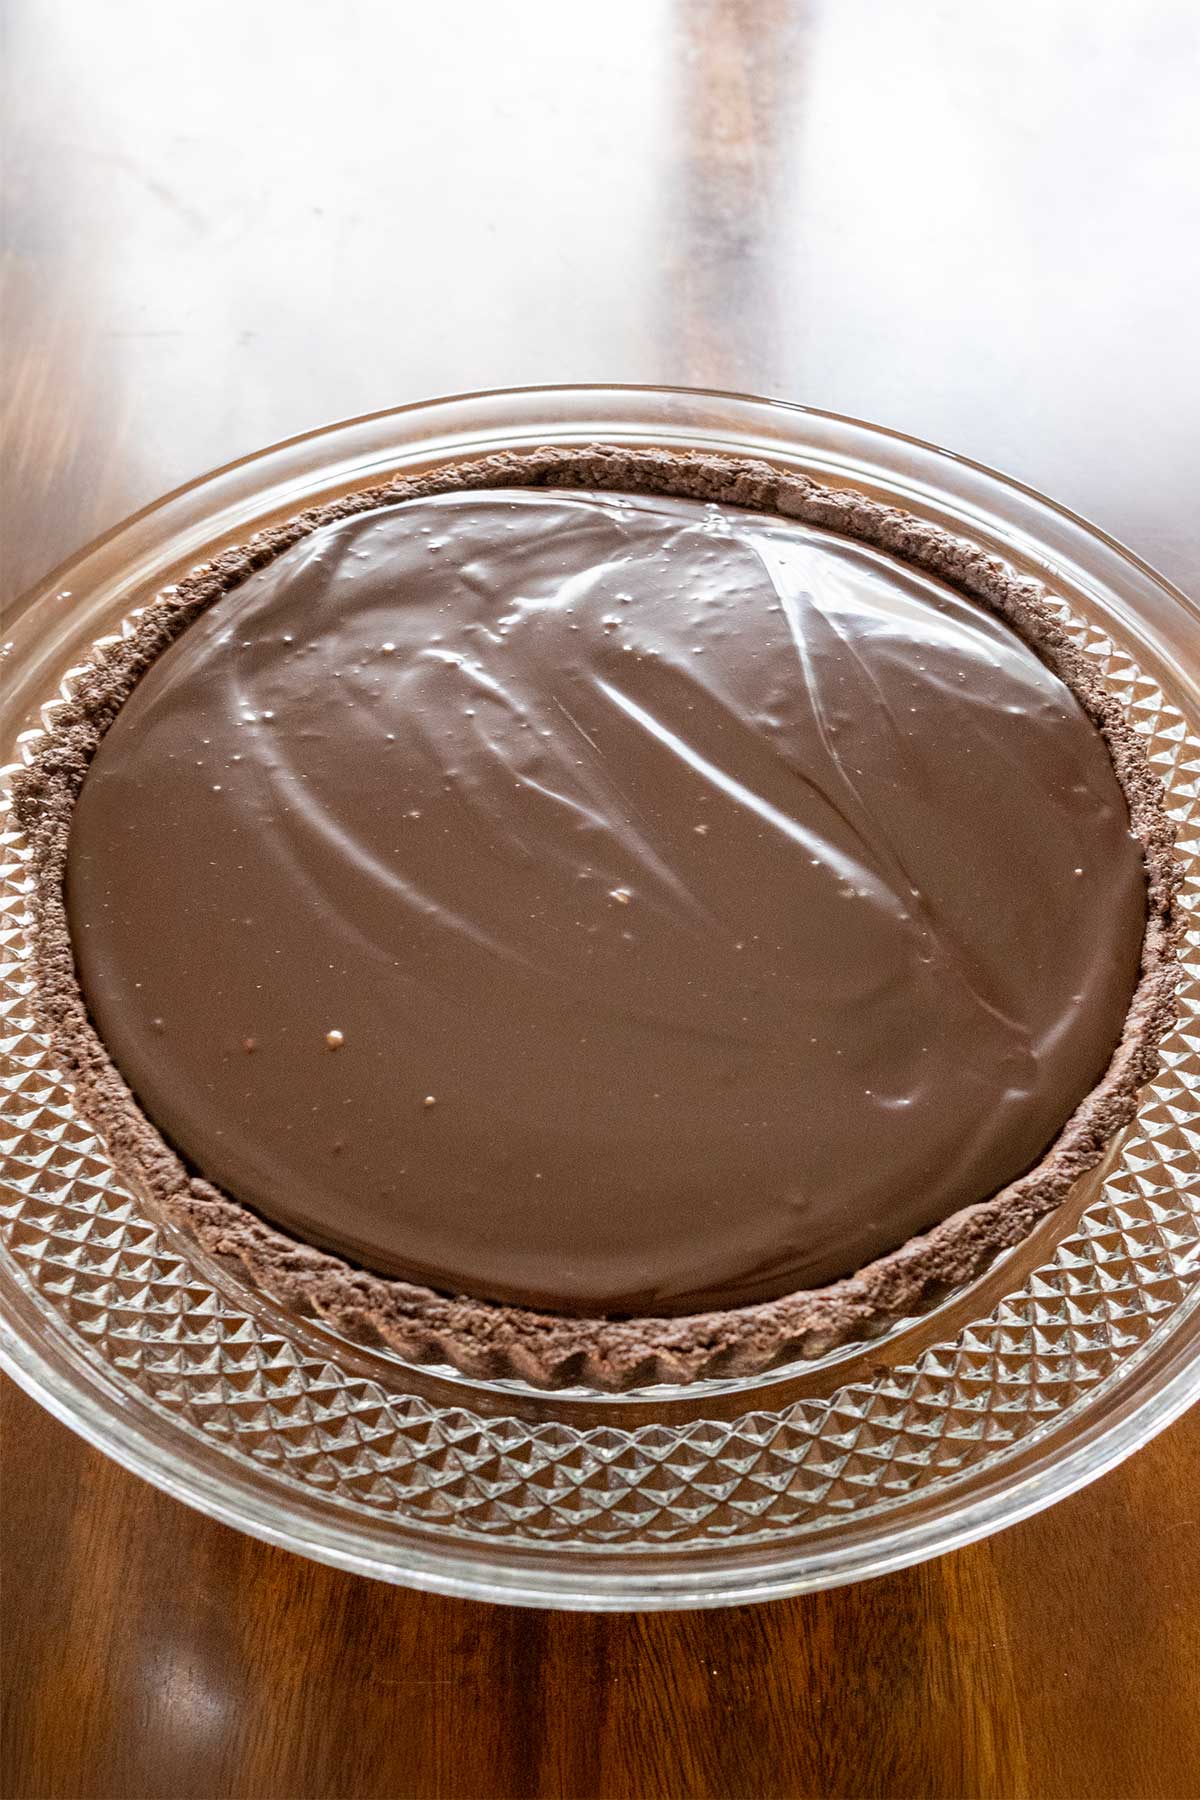
- With the freestanding crust on a stable plate, pour ganache into crust, just below the edge. Smooth the top. Move carefully to avoid cracking.
- Set at room temperature for 2–3 hours, or refrigerate for 1–1½ hours until firm.
Stabilized Whipped Cream Garnish:
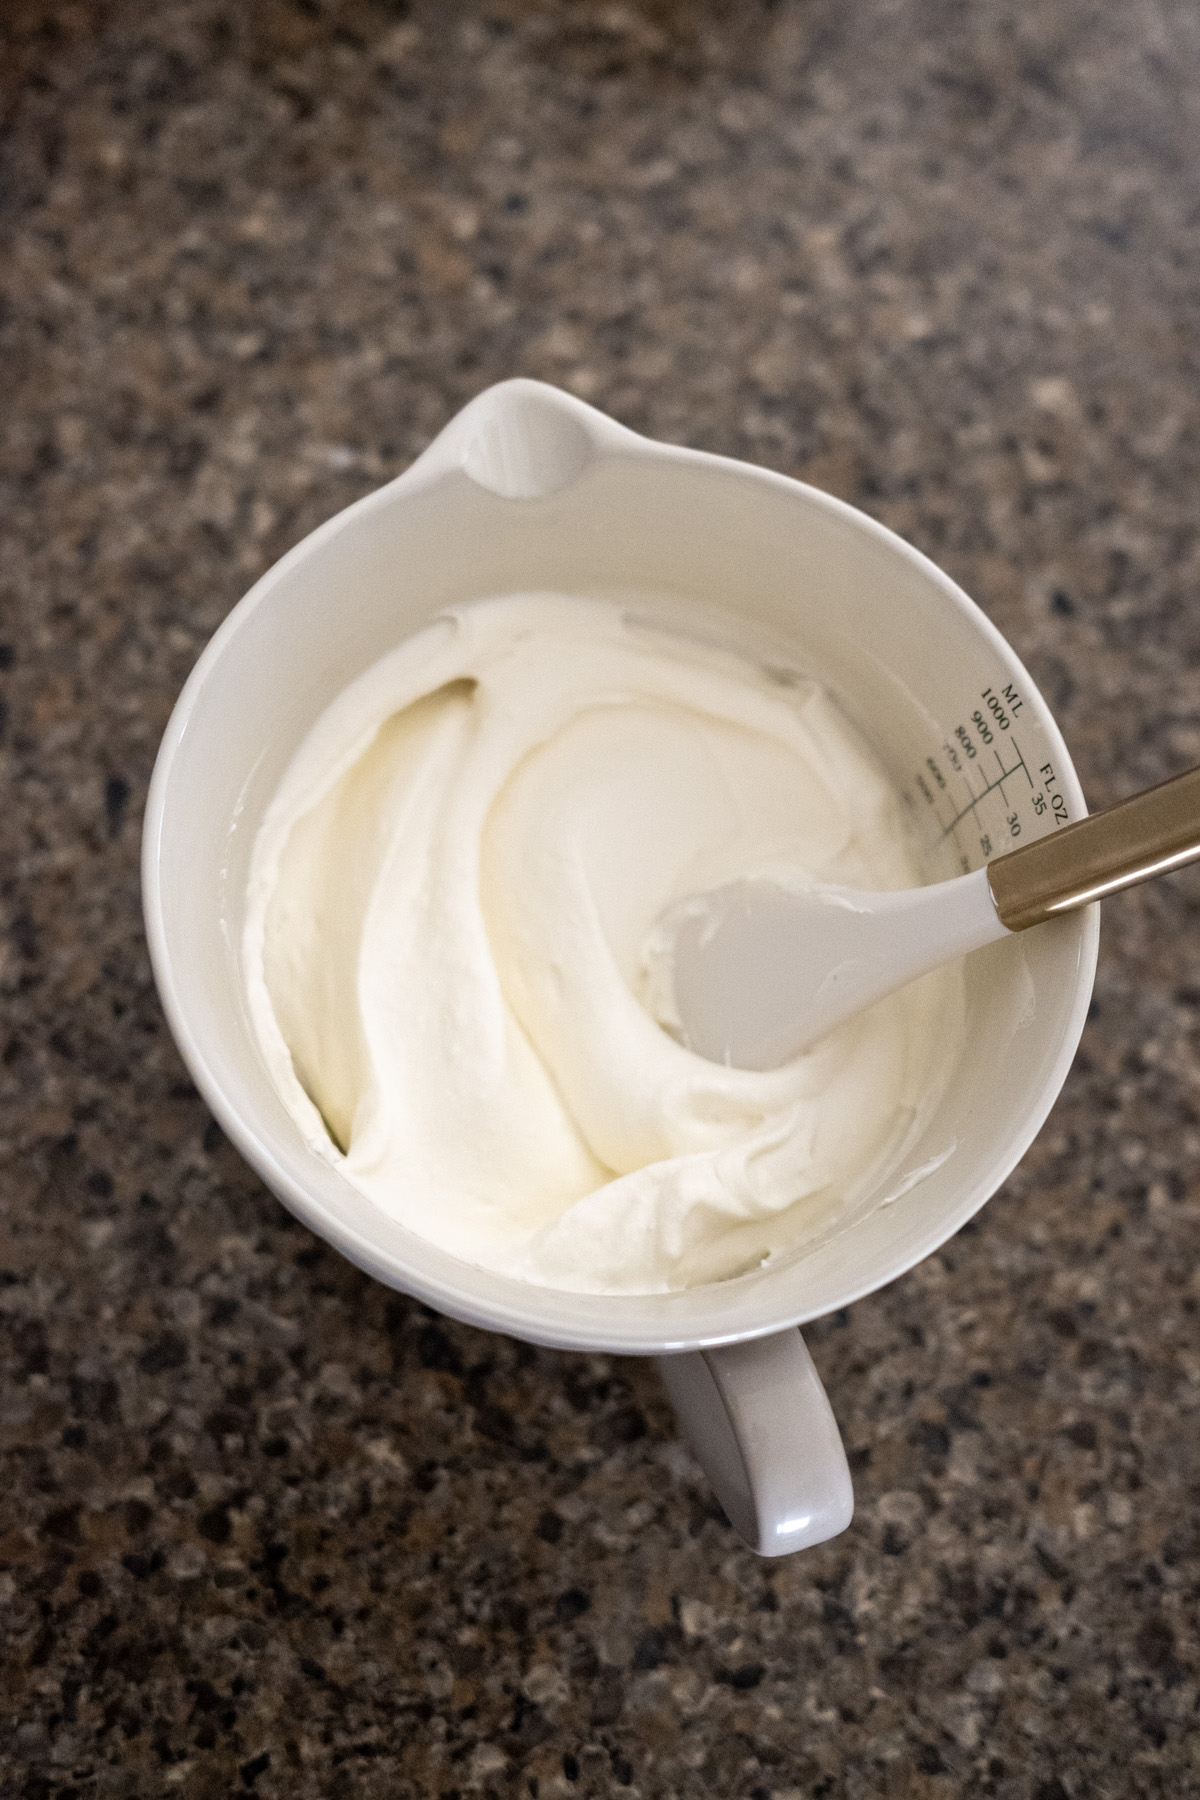
- In a chilled bowl, whip 1 cup cold heavy cream with 2 tbsp powdered sugar, ½ tsp vanilla extract, and ¼ tsp xanthan gum until stiff peaks form.
- Pipe or dollop whipped cream onto the set tart.
- Slice with a hot, dry knife and serve at room temperature.
Notes
- Fridge: Store ungarnished tart, wrapped or in an airtight container, for up to 3 days. With whipped cream, cover gently and refrigerate for up to 2 days. Bring to room temperature (~30–60 minutes) before serving.
- Freezer: Double-wrap ungarnished tart for up to 1 month. Thaw in fridge overnight, then room temp before adding cream.
- Make-Ahead: Baked crust (in pan): 2 days at room temp, 5 days in fridge, or 1 month frozen. Whole tart (ungarnished): Store as above.
Video
As an Amazon Associate, I earn from qualifying purchases at no extra cost to you. Thank you for your support!